Labels

Linux (6) OpenCV (4) Deep Learning (3) MATLAB (3) Mac OS X (3) Windows (2) C# (1) Node JS (1)

2016年1月28日 星期四

Installing Node.js + ZeroMQ on Windows

ZeroMQ (ZMQ, 0mq) is a great TCP/IP libray wrapper and lightening fast for exchanging messages. Node.js is also famous for speed, so the two combined together can make a powerful distributed cloud server. However since ZeroMQ depends on OS level library, we need to re-compile ZeroMQ if we wants to use it in Node.js. This makes some challenges on installing on Windows. (If you didn't encounter any problem, Congratulations!)

The first problem we may encounter is:

The builds tools for v120 (Platform Toolset = 'v120') cannot be found

Because the default compiler is VS 2012. 

Thanks for this post:

Cannot install node modules that require compilation on Windows 7 x64/VS2012

npm install zmq --msvs_version=2015

Just add msvs_version=.... then you can compile with any version of visual studio. Remember to install windows SDK first.

A final reminder is

Nodejs cannot find installed module on Windows?

To use ZMQ globally, add an environment variable NODE_PATH=%AppData%\npm\node_modules


That's it. Enjoy ZMQ!

2015年3月31日 星期二

Connect to Microsoft SQL Server 2012 using PHP PDO on Ubuntu

Microsoft SQL (MSSQL) databases provide a Open Database Connectivity (ODCB) interface for accessing data. First we need to enable TCP/IP connection of MSSQL in SQL Server Configuration Manager:
1. Right click to enable TCP/IP

2. Double-click to set TCP/IP port (default is 1433)


3. Restart MSSQL service

4. Also remember to open MSSQL listening port 1433 on Windows Firewall.


At the Ubuntu side, we use PHP and PHP Data Objects (PDO) for connection. PDO is a powerful tool that can connect all kinds of databases, with appropriate driver installed.


1. Enable PDO ODBC
sudo apt-get install php5-odbc


2. we also need to install unixodbc and FreeTDS (ref.). Luckily we can easily install them through apt-get:
sudo apt-get install unixodbc tdsodbc


3. After installing necessary libraries, we need to configure our Data Source Name (DSN) in /etc/odbc.ini and /etc/odbcinst.ini (from this ref.)

/etc/odbc.ini
 # Define a connection to a Microsoft SQL server  
 # The Description can be whatever we want it to be.  
 # The Driver value must match what we have defined in /etc/odbcinst.ini  
 # The Database name must be the name of the database this connection will connect to.  
 # The ServerName is the name we defined in /etc/freetds/freetds.conf  
 # The TDS_Version should match what we defined in /etc/freetds/freetds.conf  
 [MSSQL_DSN]  
 Description   = Microsoft SQL server   
 Driver        = freetds  
 Database      = Your_DB  
 ServerName    = MY_SERVER  
 TDS_Version   = 7.0  

/etc/odbcinst.ini
 # Define where to find the driver for the Free TDS connections.  
 # Make sure you use the right driver (32-bit or 64-bit).  
 [freetds]  
 Description = MS SQL database access with Free TDS  
 Driver = /usr/lib/x86_64-linux-gnu/odbc/libtdsodbc.so  
 Setup = /usr/lib/x86_64-linux-gnu/odbc/libtdsS.so  
 #Driver = /usr/lib/i386-linux-gnu/odbc/libtdsodbc.so  
 #Setup = /usr/lib/i386-linux-gnu/odbc/libtdsS.so  
 UsageCount = 1  

/etc/freetds/freetds.conf
 #Define a connection to the Microsoft SQL Server  
 [MY_SERVER]  
   host = 192.168.1.10  
   port = 1433  
   tds version = 7.0  


4. Restart Apache server to enable the ODBC features
sudo service apache2 restart


5. Finally we can use ODBC in PDO as below:
$DB_conn = new PDO('odbc:MSSQL_DSN', 'sa', 'password');


2014年12月11日 星期四

Adding iBeacon to TI CC254x

The iBeacon is Apple's indoor positioning technology based on Bluetooth Low Energy (BLE). In fact the iBeacon information is embedded in BLE advertisement Protocol Data Unit (PDU). The packet format of iBeacon is as below:


In the source code of TI CC254x, we can find the advertisement data, which is called static uint8 advertData[]. The iBeacon code and simple explanations are:

 1
 2
 3
 4
 5
 6
 7
 8
 9
10
11
12
13
14
15
16
17
18
19
20
21
// GAP - Advertisement data (max size = 31 bytes, we use 30 bytes)  
 static uint8 advertData[] =  
 {  
  0x02,  // length of first data structure (2 bytes excluding length byte)  
  0x01,  // AD Type = Flags  
  0x1A,  // Flags value  
   
  0x1A,  // length of second data structure (26 excluding length byte)  
  0xFF,  // GAP_ADTYPE_MANUFACTURER_SPECIFIC  
   
  0x4c, 0x00,  // Company ID (0x4C00 = Apple)   
  0x02, 0x15,  // iBeacon AD indicator  
    
  // Device UUID (16 bytes)  
  0xB9, 0x40, 0x7F, 0x30, 0xF5, 0xF8, 0x46, 0x6E,   
  0xAF, 0xF9, 0x25, 0x55, 0x6B, 0x57, 0xFE, 0x6D,  
   
  0x00, 0x01,  // Major No. for a group of beacons  
  0x00, 0x01,  // Minor No. for each beacon  
  0xC5, // -59 dBm TX power  
 };  


2014年9月14日 星期日

Sending Data through UART USB dongle on Mac OS X

The Universal Asynchronous Receiver/Transmitter (UART) is a hardware that enables data transmission between parallel and serial form. Common UART communication protocols include RS-232, RS-422 or RS-485.  I believe engineers who have lived in PC-era have used this cable before:


Today's computer no longer has RS-232 port. Fortunately, UART still exist in our life, just in different form:
This is USB-UART dongle made by FTDI chip. The chip on the board emulates a UART port so we can still use old technology to communicate with new chip, such as TI's Bluetooth Low Energy (BLE) chip CC2540.

So how can we connect to USB-UART? Actually Mac OS X has a command  "Screen". Just open an terminal and follow the steps below:

1. list the USB-UART device:
  $ ls /dev/cu.*                                                              
    /dev/cu.Bluetooth-Modem         /dev/cu.usbserial  
    This command will list the connected devices on your Mac. Our target is usbserial

2. Connect to the device, simple type the "screen" and baud rate:
  $ screen /dev/cu.usbserial 115200  
    The number 115200 is the baud rate used to communicate between two devices

3. To leave the screen, type CTRL-A then CTRL-\ 

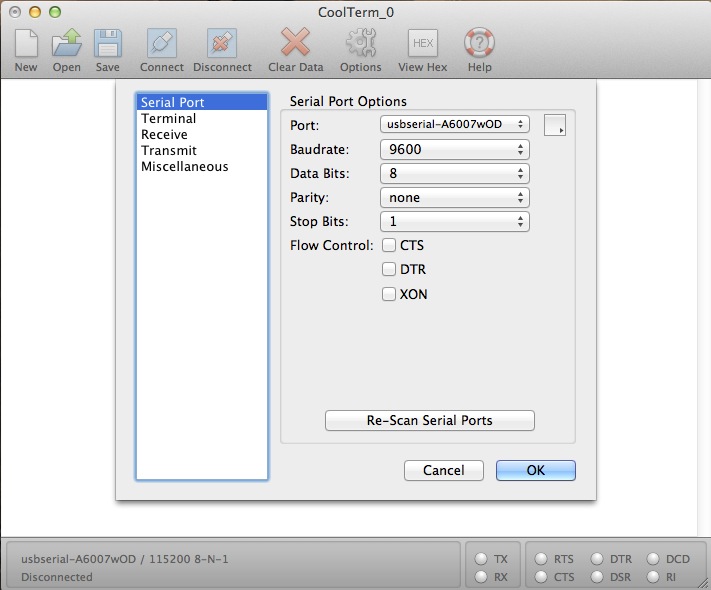
Also there are many GUI tool can be used. I recommend using CoolTerm:

A good Coolterm tutorial can be found here:


CoolTerm is written in VB and can also be run on multiple platforms (Windows & Linux), which is a very convenient feature.

2014年8月29日 星期五

Simple Windows UI Automation (Controlling other windows or processes ) by Using AutoIt or C#

Although few people are talking Windows programming nowadays, Windows Automation is still useful. I currently studied several ways to do Windows automation for factory automation or controlling POS (Point-of-Sales). All methods are calling Windows APIs (e.g. FindWindow & SendMessage), but using different wrapper.

The simplest way is to use AutoIt, which is a great wrapper for Windows API. It also has a built-in Window Info Tool:

With a few lines you can write an automation script. For example, we call a notepad window, wait for its show-up, send text to it and then close it without saving:
Run("notepad.exe")
WinWaitActive("Untitled - Notepad")
Send("This is some text.")
WinClose("Untitled - Notepad")
WinWaitActive("Notepad", "Do you want to save");
Send("!n")  //Alt-n to quit notepad without saving 


Although we can totally build an application by using AutoIt, most of the time we still want to control other Windows through our own program. Here is an example in C#.

IntPtr hWnd = IntPtr.Zero;
foreach (Process pList in Process.GetProcesses())
{
    if (pList.MainWindowTitle.Contains(wName))
        hWnd = pList.MainWindowHandle;
}
return hWnd; //Note: may be zero if can't find a matched title

Or we can call Windows API directly in C#. For wait for Window Active, we can use a timer to find window periodically:
[DllImport("user32.dll", EntryPoint = "FindWindowEx")]
    public static extern IntPtr FindWindowEx(IntPtr hwndParent, IntPtr hwndChildAfter, string lpszClass, string lpszWindow);
[DllImport("User32.dll")]
    public static extern int SendMessage(IntPtr hWnd, int uMsg, int wParam, string lParam);
    
private void timer1_tick(object sender, EventArgs e)
{
    Process [] notepads = Process.GetProcessesByName("notepad");
    if(notepads.Length==0) return; else timer1.enabled=false;           
    if (notepads[0] != null)
    {
        IntPtr child = FindWindowEx(notepads[0].MainWindowHandle, new IntPtr(0), "Edit", null);
        SendMessage(child, 0x000C, 0, textBox1.Text);
    }
}
For program like Notepad, it's better to find process first, because the title of window is changed by it's content.

There is a great Windows message APIs wrapper for using WM_DATACOPY called MessageHelper :
https://gist.github.com/BoyCook/5075907

More advanced UI automation tricks can be found in:
UI Automation Clients for Managed Code

One important application of Windows Automation is to send inputs (keys or mouse clicks) to background Windows. However, I didn't found an effective way to do this task. SendMessage or PeekMessage not always work. The current method I am using is to set my application on top, call "SetForegroundWindow" and "SendKeys". For mouse clicks, I'm still looking for effective method.

// import the function in your class
[DllImport ("User32.dll")]
static extern int SetForegroundWindow(IntPtr point);

// Find the target process and send keys

Process p = Process.GetProcessesByName("notepad").FirstOrDefault();
if (p != null)
{
    IntPtr h = p.MainWindowHandle;
    SetForegroundWindow(h);
    SendKeys.Send("{F1}");
    SendKeys.SendWait("{Enter}");
}

2014年8月26日 星期二

Using HTTP basicAuth, bodyParser, cookieParser and other modules in ExpressJS 4.0

ExpressJS 4.0 removes all middlewares and make them independent packages. Therefore we cannot use ExpressJS 3.0 code directly. For basicAuth, some people implement their own version of HTTP basic authentication. But I think the easiest way is to use npm to install "basic-auth-connect" module:

var basicAuth = require('basic-auth-connect');
app.use(basicAuth('username', 'password'));

Follow the same rule, just install the necessary modules then we can use the old 3.0 codes! But the names of the new modules are different from original ones. The complete mapping table is as below (thanks to  Chris Sevilleja):

Express 3.0 NameExpress 4.0 Name
bodyParserbody-parser
compresscompression
cookieSessioncookie-session
loggermorgan
cookieParsercookie-parser
sessionexpress-session
faviconstatic-favicon
response-timeresponse-time
error-handlererrorhandler
method-overridemethod-override
timeoutconnect-timeout
vhostvhost
csrfcsurf

2014年7月26日 星期六

Configure MATLAB MEX compiler on OSX by Using clang/clang++

The MATLAB mex cannot be directly run on OSX, due to the Apple's proprietary C/C++ compiler. Therefore we need to modify mex config file. There are many ways to achieve this. My steps are as following:

1. Run "mex -setup" in MATLAB, you will see the options:

The options files available for mex are:
 1: /Applications/MATLAB_R2010a.app/bin/gccopts.sh : 
      Template Options file for building gcc MEX-files
 
  2: /Applications/MATLAB_R2010a.app/bin/mexopts.sh : 
      Template Options file for building MEX-files via the system ANSI compiler'


2.  Select "mexopts.sh" as template. MATLAB will create a copy at your home folder:
"~/MATLAB/R2011b/mexopts.h"

3. Open "~/MATLAB/R2011b/mexopts.h" and find string "maci64", change CC='gcc' to CC='clang', and CXX='g++' to CXX='clang++':


4. MATLAB MEX will complain that  "error: unknown type name 'char16_t' typedef char16_t CHAR16_T;". To solve this issue, add the definition in preprocessor flag "-Dchar16_t=uint16_T" :

COPTIMFLAGS='-O2 -DNDEBUG -Dchar16_t=uint16_T'


4. Restart MATLAB, MEX should work fine!